knitting


for cheerful dish washing.

When I started knitting I swore I would never ever knit a dishcloth. I disguised the first one as a handkerchief. But there’s no excuse this time…

This is my Japanese-inspired Candy Cane dish scrubby. You can download it for free from the Knit Circus website. Yes folks, the lowly dishrag is my first for-real published pattern.

The scrubbies pictured here are knit with a tough jute/acrylic blend.

The pattern is finally ready. I’ve decided to keep it free because I’m still getting the hang of this pattern writing thing. I’d love any feedback. You can also download the PDF from Ravelry.  

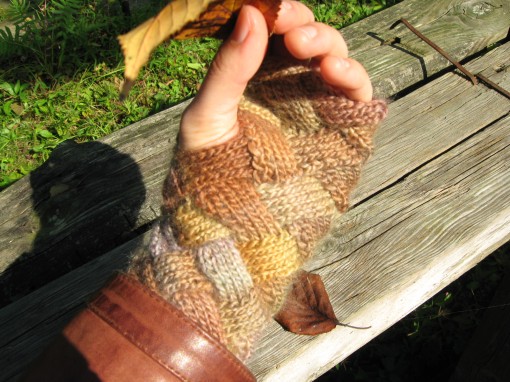
cozy wrist warmers

cozy wrist warmers


Click here to read on.

(more…)

Thanks to the small-world of internerd knitters, I just read good news and some bad news from the Octopus and the Rose blog. The bad news is there are still hateful people in this world who abuse others based on sexuality. The good news is there continues to be encouraging and positive responses to such violence. Cheeky name and all, the Pansy Project is one such response.

(image taken from The Pansy Project)

(image from The Pansy Project)


(the reward for reading to the end of my rant is a free knitting pattern!)

(more…)

It’s getting on fall in Japan. There’s a chill in the air and it’s time to rake the leaves and harvest the last of the veggies from the garden. Plant bulbs. When we think of fall, it’s often the bold colours. Vermillion, Orange, Gold. But here in Japan it’s the muted colours I see most often: A rice harvest curing in a paddy, fallen chestnuts, distant smokey mountains finally visible as the summer haze lifts.

Back home it’s getting on winter. There are flurries in the forecast, my mum wrote to tell me. “A cute sounding word for something kinda cold and really unwanted just yet…”

The changing seasons were the inspiration for my latest knitting project. Knit with a cozy wool, silk, mohair blend. I’m in the process of writing up the pattern, but here’s a sneak peak.  

entre deux saisons

entre deux saisons

This is an oldie, but I’m only now getting around to publishing it..

I wore this neck warmer all through the northern Canadian summer. sigh.

I wore this neck warmer all through the northern Canadian summer. sigh.

Last Spring, with a pair of bachelor’s degrees under our belts, my boyfriend and I packed up the pick-up truck and headed for the Yukon. The days were still cool and the nights in the tent could be downright cold. In fact, it was the worst summer weather the Yukon saw in some 30 years. I wanted to knit something to keep me warm and also wanted to display some beautiful soft handspun I picked up in Nelson. Nelson is a beautiful town in interior British Columbia full of draft dodgers and ski bums. I came up with this simple and versatile neck warmer that can also double as a toque. This design is also great for snowboard and ski enthusiasts who worry about getting tangled in their scarf.


MATERIALS

[MC] Mountain Yarns Crafts [100% wool one-ply; 65g skein]; color: Green; 1 skein

[CC] Mountain Yarns Crafts [100% wool one-ply; 65g skein]; color: Orange; 1 skein

2 sets of US #7/4.5 mm double-point needles (or a toque-sizes circular needles)

Safety pin: GAUGE: 23 stitches and 28 rows = 4″ in stockinette stitch

PATTERN NOTES: Stripe pattern: MC x17; CC x 2; MC x 2; CC x 10; MC x 2; CC x 14; MC x 1; CC x 2, MC x 3; CC x 4; MC x 5; CC x 1; MC x 10

PATTERN: 1. TUBE: Cast on 90 sts. and divide between 3 or 4 dpns. Work 15 rows of stockinette stitch in the round.

You’re now about to create the casing for a drawstring: Count six rows back in the work and pick up 90 sts back onto the second set of dpns. (Note: to make it easier you can put the stitches from the main needles onto holders while you work this second layer)

Work this “second layer” for 2 more rows.

On the 3rd row: Needle 1: K1, Yarn over, k2tog, k until 3 stitches from end of N1, k2tog, YO, K1 (The YOs form holes for the drawstring). 

Work 2 more rows, until the front and back flaps of the casing are the same length.

Join the flaps together by knitting through one stitch from the front and back together.

pull the drawstrings and it becomes a toque.

pull the drawstrings and it becomes a toque.


Now the hard part is now over. Continue knitting in the round until the tube measures 10 inches. Bind off (hint: if you use a larger needle to bind off the stitches will stay stretchy)

2. I-CORD: Using two dpns, CO three stitches. Knit across row, then slide the stitches to the other end of the needle and knit across again.. and again… and again… until the cord measures 2 ft long

FINISHING: Weave in any loose ends. Push the i-cord through the casing using a safety pin.

This is my first attempt at actually writing out a knitting pattern. I thought I’d start off easy with a facecloth. 

Starburst stitches evoke images of spring blossoms and summer fireworks.

Starburst stitches evoke images of spring blossoms and summer fireworks.


It’s mid-summer in Japan. Hot and so humid it’s like you’re swimming. If you can’t find refuge somewhere air conditioned, you will likely engage in the national pasttime of dabbing your forehead and neck with a little towel. 

     Everyone in Japan carries a facecloth. They’re practical, not just for wiping sweat, but because public washrooms here rarely have hand dryers.

     Some other national past-times include springtime flower viewings (hanami) and summer fireworks displays (hanabi). I chose a star-burst pattern that evokes both of these images. (See Elizabeth Freeman’s Laminaria from Knitty’s Spring 08 issue).

     Towels are a major accessory here, so be luxurious and knit several to match your shoes and favourite handbag.


Materials:

I used Ski Yarn brand cotton yarn (pink) and Charkha Cotton Tweed (green), though any soft cotton is suitable. 

Pair of 3.5mm (pink) or 4mm (green) needles.

Darning needle for finishing.


Star Pattern: 

Knit three together but don’t drop them from the left needle. Yarn over and knit into the three again. (Three stitches becomes three stitches).


Increases:

Work the star pattern in a single stitch (One stitch becomes three stitches).


Pattern:

CO 3 sts

Row 1 (RS): Increase, k1, inc (7 sts).

Row 2 (all WS rows): purl.

Row 3: inc, k1, star, k1, inc  (11 sts).

Row 5: inc, k1, star, k1, star, k1, inc (15 sts).

Continue in this pattern increasing at each edge until your hanky measures about 7 inches along one edge. 

RS: Work without increasing: k2, *star, k1**, repeat from * to ** ending with star, k2.

WS: purl.

RS: Start decreasing:  k3tog, k1, *star, k1**, repeat from * to **, knit last 3sts tog.

WS: purl.

Continue decreasing on eithe

r edge until 5 stitches remain. 

RS: K2tog, k1, k2tog.

WS: P3tog, break yarn and pull through the loop.


Finishing: Weave in loose ends.